Important note: Desk booking is not configured to all organisations. By default, Steerpath Smart Office uses capacity booking to handle desk sharing. This tutorial is designed for organisations specifically using the desk booking feature instead of the capacity booking.
This short guide will help users to quickly and easily book desks based on their needs.
There are two ways to search and book for a desk, suitable for the user's specific needs:
Desk booking in the booking view
Desk booking on the map view
Both ways offer similar options, they just have a slightly different user flow. Users can choose whichever way they prefer to get the job done.
Book a Desk in Booking View
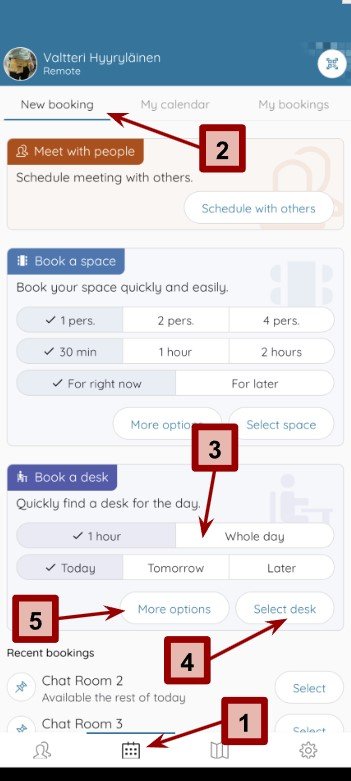
Open Steerpath Smart Office app and navigate to the booking view by clicking on the calendar icon on the bottom menu (1). Go to “new booking” tab (2). This will open the booking view where you can also arrange meetings with colleagues as well as reserve meeting rooms.
There are a few quick options to choose from the main view: whether you want to quickly book a desk for the next hour or a full day today, tomorrow or later (3). To continue with booking, click “select desk” (4).
If none of the quick options apply to your needs, select “more options” (5) to specify.
After clicking “more options” in the previous screen, you need to specify your booking time settings here. If you chose from the quick settings, you can move on to the next page to continue with selecting the desk.
First specify the duration of your booking (1). The default setting here is based on your selection in the previous screen (1 hour or whole day) but it can be changed by clicking on arrows around the selection. Available selections are: 15min, 30min, 1h, 1h 30min, 2h, 3h, 4h, 8h, whole day, 2 days, 3 days, 4 days and 5 days.
Then you need to specify your starting time (2). If you’re booking whole days, you can skip the time selection and only select the starting date.
Click next to go pick a desk for your booking (3).
For example, if I want to book a desk for tomorrow from 9:00 to 12:00 I will first select 3h duration. Then I will pick tomorrow as the starting date and select 9:00 as the starting time and click “next” to search available desks for that time period.
Booking view
More options subview
Booking view
completing desk reservation
Here you will see a list of desks that are available for your specified time. Each desk will show information about its location under the name: building and floor where it’s located at. You can scroll through the list or use search to look for a specific desk by name.
If you want to see where the desks are located on the map, you can click on the map icon (1) on any of the available desks. You can return to the desk selection from the map view by clicking on the calendar view on the bottom menu (2).
Click “select” (3) on any of the desks to pick that for your booking. Once you’re ready, click “book” to complete your booking (4). You will see a confirmation of a successful booking (second picture).
Book a Desk in Map View
Open Steerpath Smart Office app and navigate to the map view by clicking on the map icon on the bottom (1). This will open the map view where you will see the whole office map.
The map view shows bookable desks and meeting rooms with a calendar icon. The bookable desk icon is a bit smaller compared to the bookable meeting room icon to accommodate tighter spaces. The map shows the current booking status in its icon: green for available and red for unavailable. Click on the desk you would like to book to proceed (2).
This will open a small information card on the bottom. Click on the calendar icon (3) on the card to go ahead with booking the desk.
Map view
Desk information card functions
The bottom card expands to full screen where you are given a few options to proceed with the booking.
In the instant booking section (1) you can quickly book this desk for the next 30 min, 1 hour, 2 hours, rest of today or whole tomorrow. Clicking on any of these options will complete your booking and you will see a confirmation message after a successful booking.
If you click “view calendar” (2) you will be taken to a calendar view that shows the desk’s availability in a calendar view.
Clicking on the “pick a time” (3) will take you to a reservation screen where you can choose the start and end time for your reservation.
Map view
Continue booking with “view calendar”
In the calendar view you can see the desk’s availability in a calendar.
You can scroll through different days by using the arrows around the date selection or clicking on the date where you can specify the date you want to view (1).
At the top of the view is a time selection (2) where you need to specify the duration of your booking. Notice that the selection indicating your booking will change in the calendar based on the duration you’ve selected (3). This will help you to visually confirm that the desk is available for your needs.
Click on the calendar slots to pick the start time for your booking. The calendar view will allow you to pick times in 15-minute increments. The time selection is also visible on the bottom (4).
When you’re ready to go ahead with your booking, click on the confirmation button (5) on the bottom.
This will take you to the booking view where you can confirm your earlier selections or make changes to your booking. Click “select time from calendar” to return to the calendar view. When you’re happy with your selections, click “confirm booking”. This will confirm your booking, and a confirmation is shown upon a successful booking.
Map view
Continue booking with “pick a time”
This will take you directly to the booking view where you can select the start and end times for your booking (1). If you want to see the reservation calendar for the desk you have chosen, click on the “select time from a calendar” button (2).
When you’re happy with your selections, click “confirm booking” (3). This will confirm your booking, and a confirmation is shown upon a successful booking.
Manage your bookings
To edit or cancel your bookings, go to the calendar view by clicking on the calendar icon on the bottom menu (1).
From there click on “my bookings” to see all your bookings (2). Here you can see all the bookings you have made sorted by days.
To see further into the future, use the week selection on the top to either go see your future or past bookings (3).
To manage a booking, click on the booking.
This will open the existing booking with all of its information.
Click on the pen icon to make changes or the trash can icon to delete or cancel your booking.


